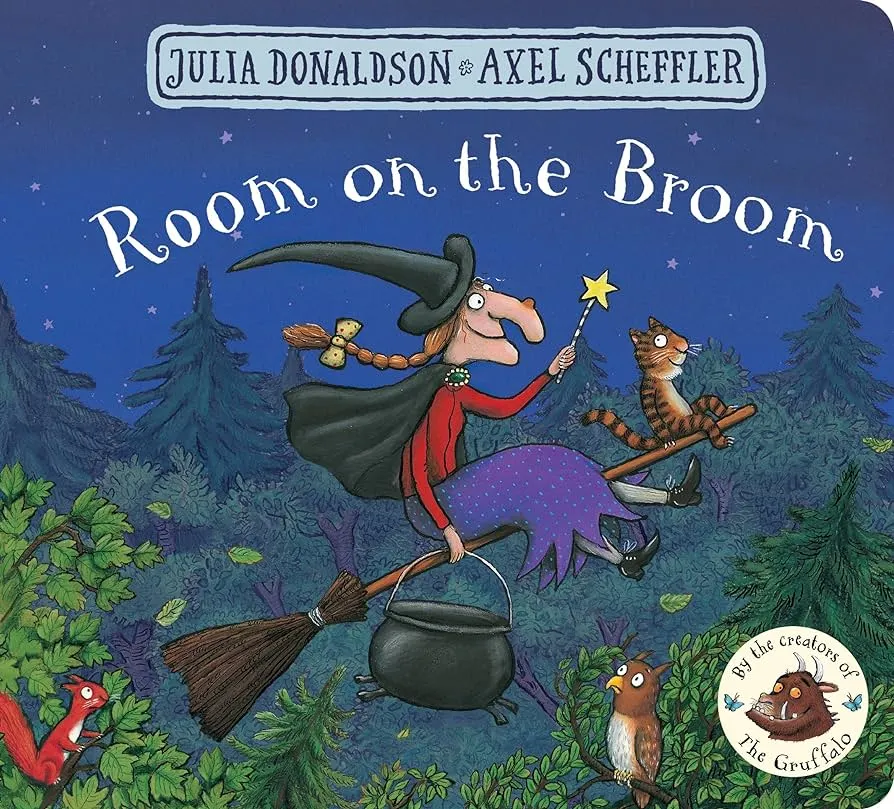
Who doesn’t love the whimsical world of the Room On The Broom Witch?
This beloved character has captivated the hearts of children and adults alike with her adventures.
Creating a DIY costume of this iconic witch can be an exciting project, allowing you to bring a piece of the magic into your home.
Whether it’s for a themed party, Halloween, or just for fun, this guide will help you capture the essence of the Room On The Broom Witch in a creative and enjoyable way.
Also, don’t forget, if you want to save on kid’s clothing check out this article for more info.
Table of Contents
ToggleMaterials Needed
Before diving into the magical world of costume creation, let’s ensure we have all our broomsticks in a row.
Crafting a DIY Room On The Broom Witch Costume that captures the essence of the beloved character is an exciting project.
Here’s a detailed breakdown of the materials you’ll need to bring your witch to life:
Black Fabric
- Type: Opt for a lightweight, flowy fabric that mimics the whimsical nature of the witch’s attire. Cotton, linen blends, or even a soft polyester can work wonders. You’ll need enough to create both the dress and the cape, so measure accordingly.
- Quantity: The amount of fabric required will depend on the size of the costume. Typically, 2 to 3 yards should suffice for a child’s costume, and more may be needed for an adult.
- Where to Find: Fabric stores, online retailers, or even thrift shops can be great sources for black fabric at affordable prices.
The Bow (Yellow Felt)
- Type: Choose a soft, yet durable felt that’s easy to work with for crafting. This type of material is perfect for creating a vibrant and sturdy bow, echoing the playful nature of the witch’s costume. Opt for a bright yellow to make the bow stand out.
- Quantity: For one bow, a single sheet of felt, typically measuring 9×12 inches, will suffice. If planning multiple bows or larger projects, consider purchasing felt by the yard.
- Where to Find: Yellow felt can be found at craft stores, both brick-and-mortar and online. Look for fabric shops that offer a variety of colours and textures to select the perfect shade of yellow for your bow. Online retailers often provide a broader selection and may offer bulk purchasing options for larger projects.
Witch’s Hat
- Materials Needed: For a DIY hat, you’ll need stiff black card for the base and felt or similar fabric to cover it. Adhesive (fabric glue or hot glue) and any decorative elements (buckles, ribbons) will complete the look.
- Making It: Crafting the hat involves shaping the card into a cone and covering it with fabric. Personalise it with unique touches to stand out.
Broomstick
- Construction Materials: Gather sturdy sticks or twigs for the bristles and a bamboo pole or a straight stick for the handle. Twine or strong string will be used to bind the bristles to the handle.
- Assembly Tips: Look for a bamboo pole that’s comfortable to hold and long enough to suit the height of the person wearing the costume. The natural look of the sticks will add authenticity to your broomstick.
The Wand
- Type: A kitchen wooden spoon serves as the wand’s sturdy base, with additional materials for the star including yellow felt or cardboard and yellow tissue paper for decoration. Use a black marker for detailing on the wand’s handle.
- Quantity: One wooden spoon, one sheet of yellow felt (9×12 inches) or a large piece of cardboard, one roll of masking tape, a small bottle of PVA glue, one to two sheets of yellow tissue paper, and a small amount of stuffing if using felt. One permanent black marker is needed for the handle.
- Where to Find: Wooden spoons are available in kitchen supply stores and supermarkets. Yellow felt, cardboard, masking tape, PVA glue, yellow tissue paper, and black markers can be found at craft stores and online retailers. Sewing supplies like needles and thread for felt versions are available at sewing supply stores.
The Cloak
- Type: Black fabric for the cloak’s main body, with green and yellow felt for decorative broach. Thick elastic and a piece of velcro are used for the cloak’s closure mechanism.
- Quantity: 1m x 1m of black fabric, enough elastic to fit loosely around the neck, a small piece of velcro (about an inch), and small pieces of green and yellow felt for the broach decoration.
- Where to Find: Black fabric can be found at fabric stores, both in physical locations and online. Elastic, velcro, and felt are available at craft stores, sewing supply stores, or online retailers.
Face Paint
- Colours: Green face paint is essential for achieving the witch’s iconic look. You’ll also need black for details and dark lipstick for the lips.
- Additional Effects: Consider using face paint or makeup to create fake warts or moles. Safe, non-toxic face paint is crucial, especially for sensitive skin.
Additional Accessories
- Cauldron: A small black pot can serve as a cauldron. It can be real or made from papier-mâché for a lighter option.
- Stuffed Animals: Represent the witch’s companions with stuffed animals. You can often find these at toy stores or make them yourself with fabric scraps.
- Wand: A simple stick or a crafted wand from painted wood can add a magical touch. Decorate it with ribbons, beads, or glowing paint for an enchanted effect.
Safety Considerations
- Non-Toxic Materials: Ensure all materials, especially face paint, are non-toxic and safe for use, particularly for children.
- Comfort and Fit: Make sure the costume is comfortable to wear, with no sharp edges or loose parts that could cause accidents.
- Visibility and Mobility: The costume should allow for clear visibility and easy mobility, especially important if it will be worn for trick-or-treating or outdoor events.
| Item | Description/Notes |
|---|---|
| Black Fabric | Lightweight, flowy fabric for the dress and cape. Approximately 2-3 yards. |
| Witch's Hat | Can be crafted from stiff black card and fabric. Decorate as desired. |
| Broomstick | Sturdy sticks and a bamboo pole for the handle. Use twine to bind. |
| Face Paint | Green face paint for the witch's look, along with black for details and dark lipstick. |
| Additional Accessories | Includes a cauldron, stuffed animals (cat, dog, bird, frog), and a wand. |
Step-by-Step Instructions
Step 1. Gather Materials:
Start your magical journey by collecting all the necessary materials.
You’ll need:
- Black fabric for the dress and cape
- A witch’s hat (or materials to make one)
- A broomstick (real or crafted)
- Face paint for that authentic witch look
- Additional accessories, such as fake spiders, a cauldron, or stuffed animals, to enhance your costume
Remember, the essence of DIY is using what you have creatively, so don’t hesitate to repurpose materials or find affordable alternatives.
Step 2. Dress and Cape:
The dress and cape are the foundation of your witch costume.
Use the black fabric to craft a simple yet effective dress and cape.
Measure twice, cut once, and sew with care to create garments that are not only spooky but comfortable too.
This costume is all about having fun, so ensure the fit allows for plenty of movement and witchy antics.
Step 3. Witch’s Hat:
A tall, pointy witch’s hat is crucial for capturing the character’s essence.
If you don’t already have one, you can easily make it with black cardstock, sticky tape, and a little imagination.
Feel free to personalise your hat with feathers, stars, or moons to make it uniquely yours.
Step 4. Broomstick:
No witch is complete without her trusty broomstick.
For a DIY approach, gather sticks and twigs for the bristles and attach them to a bamboo pole with twine.
This homemade broomstick will not only look great but also give your costume a personal touch.
Step 5. Costume Accessories:
Accessories add depth to your costume.
Consider crafting a cauldron from a painted pot or adding a belt with pouches for potions.
Stuffed animals can represent the witch’s companions from the story, adding a layer of detail that fans will appreciate.
Step 6. Makeup and Face Painting:
Transform your appearance with witch-like makeup.
Use green face paint as a base, then add details like fake warts, a crooked nose, or dark, exaggerated eyebrows.
Don’t forget the dark lipstick to complete your witchy transformation.
Step 7. Personalisation and Final Touches:
This is where you can let your creativity shine.
Add lace to the hem of your dress, create a unique pendant to wear, or even design your own spellbook prop.
Practice your witch’s cackle and perfect your broomstick-riding posture for a truly immersive experience.
Step 8. Safety Considerations:
Safety is paramount, especially if the costume is for a child.
Ensure all materials are non-toxic, the dress and cape are flame-resistant, and the broomstick has no sharp edges.
Also, consider the visibility of the costume for nighttime events, adding reflective tape if necessary.
Creating your DIY Room On The Broom Witch Costume is an adventure in creativity and resourcefulness.
By following these steps and adding your personal touches, you’ll craft not just a costume, but a memorable experience.
| Step | Instructions |
|---|---|
| 1. Gather Materials | Collect black fabric, a witch's hat, broomstick, face paint, and any additional accessories. |
| 2. Dress and Cape | Cut and sew the black fabric to create a witch's dress and cape, ensuring a comfortable fit. |
| 3. Witch's Hat | Make a witch's hat using black card, sticky tape, and decorative elements if a ready-made hat is not available. |
| 4. Broomstick | Gather sticks and a bamboo pole to create a DIY broomstick, binding them with twine. |
| 5. Costume Accessories | Add additional accessories like a cauldron, stuffed animals, and a wand to enhance the costume. |
| 6. Makeup and Face Painting | Use green face paint, fake warts, and dark lipstick to create a witch-like makeup look. |
| 7. Personalisation and Final Touches | Encourage readers to add their own creative touches, incorporating unique props or personalised details. |
| 8. Safety Considerations | Ensure all materials and accessories are safe and suitable for the intended wearer, especially children. |
Tips and Tricks
Hunting for affordable materials can be as fun as the project itself. Thrift stores and yard sales are treasure troves for costume makers.
And don’t shy away from customisation; this is your chance to shine!
Costume Accessories
Enhance your witchy attire with additional accessories. A cauldron, a collection of stuffed animals, or a handmade wand can elevate your costume from great to spellbinding.
Makeup and Face Painting
Green face paint, fake warts, and dark lipstick will add that perfect witchy touch. It’s not just about the clothes; it’s about embodying the character through and through.
Safety Considerations
Safety is paramount, especially for little witches in training. Ensure all materials and accessories are safe and comfortable, especially if the costume is for a child.
Cost-Effective Alternatives
Creativity over cash is our mantra. Look for budget-friendly alternatives that don’t compromise on the magic. Sometimes, the best materials are already hiding in your home.
Personalisation
Make your witch costume uniquely yours. Add personal touches, props, or even a backstory. After all, every witch has her own tale.
Tips for Group Costumes
Gathering a coven? Coordinating with friends or family can amplify the fun. Mix and match characters from Room On The Broom for a magical group ensemble.
Final Touches
Practicing your witchy laugh and walk can add a whole new layer of authenticity. It’s the little details that complete the transformation.
References and Resources
For further inspiration or guidance, turn to the Room On The Broom book or movie.
There are countless tutorials online that can offer additional tips and tricks.
Crafting your DIY Room On The Broom Witch Costume is more than just a project; it’s an adventure into the heart of creativity and fun.
Truly Magnificent Broom: If you want to recreate the Truly Magnificent Broom from the Room on the Broom story, you can use a PVC frame to attach the front and back of the broomstick to a wheelchair. You can also use PVC to create the piece that holds the bird.
DIY Witch Broom: To complete your witch costume, you’ll need a broomstick. Instead of buying one from a party store, you can make your own DIY witch broom. Start by gathering ordinary sticks and twigs from the woods or your backyard. Combine them with an inexpensive bamboo pole and twine from a home improvement store. This DIY witch broom can be crafted in just 5 minutes for less than £5.
Online Retailers: If you prefer to purchase a Room on the Broom witch costume, you can check online retailers like Amazon for ready-made options.
Happy crafting, and may your witch’s journey be magical!
FAQs For Making Your Own Room On The Broom Witch Costume
A simple Room on the Broom witch costume can be made using a red shirt, purple skirt, white tights, black shoes, and a black cape made from any black fabric pinned with something green. Complete the look with a witch’s hat, braid, and bow. Don’t forget to add a small witches broom, a cauldron, and stuffed animals like a cat, dog, bird, and frog to finish the outfit.
To create the Truly Magnificent Broom from Room on the Broom for a wheelchair user, you can use a PVC frame to attach the front and back of the broomstick to the wheelchair. You can also use PVC to create the piece that holds the bird.
Yes, you can check online retailers like Amazon for ready-made Room on the Broom witch costumes.
To make your own DIY witch broom, gather ordinary sticks and twigs from the woods or your backyard. Combine them with an inexpensive bamboo pole and twine from a home improvement store. This DIY witch broom can be crafted in just 5 minutes for less than £5.